A complete hands-on tutorial for multi-color 3D printing: Image-to-3D, AI color segmentation, and final printing.
Introduction: This Might Be Your Story Too
Last Friday afternoon, a colleague from the marketing team came to me with an urgent request.
“We need a physical mascot model for a client meeting next Monday. It needs to be multi-colored, about the size of a fist, something we can place on the table. Oh—and we don’t have a 3D model. We only have this flat design image.”
She handed me an illustration: a multi-colored armored lion statue.
My first thought was straightforward:
Turning a 2D image into a multi-color 3D printed model usually takes at least two or three days—sometimes more.
But three days later, that exact model was sitting on the table in the client meeting.
So how did we do it?
The answer was simple: Hitem3D’s Image-to-3D combined with AI color segmentation.
In this article, I’ll walk you through the entire workflow step by step. If you’re facing a similar “from nothing to physical object” challenge, you can follow this process directly.
The Scenario: Creating a Multi-Color Company Mascot
Goal
Turn a flat design image of a company mascot into a multi-color 3D printable model.
Requirements
- Clear separation of colors
- Clean color boundaries with no bleeding
- Desktop-sized (roughly the size of a fist)
Time Budget
Completed within three days (in reality, it took less than half a day).
Tools Used
- Hitem3D (Image-to-3D + AI color segmentation)
- Bambu Studio (slicing software)
- Bambu Lab X1C with AMS (multi-color 3D printing)
Step 1: From a Single Image to a 3D Base Model
We started with no 3D model—only a flat image.
In the past, this would mean hiring a 3D artist. Best case: one full day. Worst case: a week or more, plus additional cost.
With Hitem3D, the Image-to-3D feature makes this step dramatically simpler.
What I did
- Opened Hitem3D and selected the Image-to-3D feature
- Uploaded the mascot’s front-view design image (PNG format)
- Clicked generate and waited a few minutes
Result
A complete 3D base model with clean geometry and no broken surfaces—ready for color segmentation.
Tip
If you already have an STL or OBJ file, you can skip this step entirely and move directly to color segmentation.
img_v3_0210p_052e48fa-1194-4587-a723-bdb271e4186g (1).jpg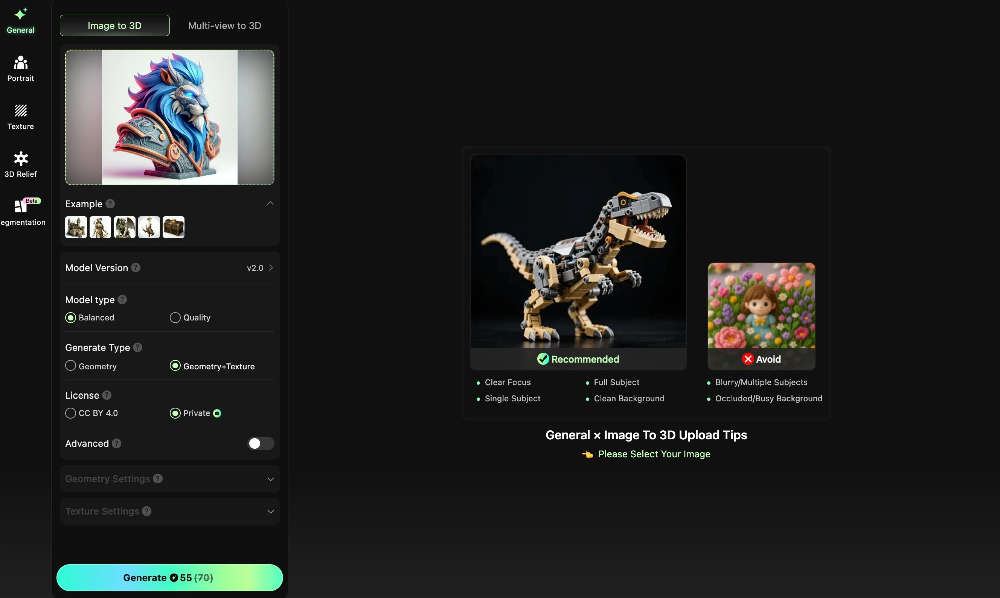
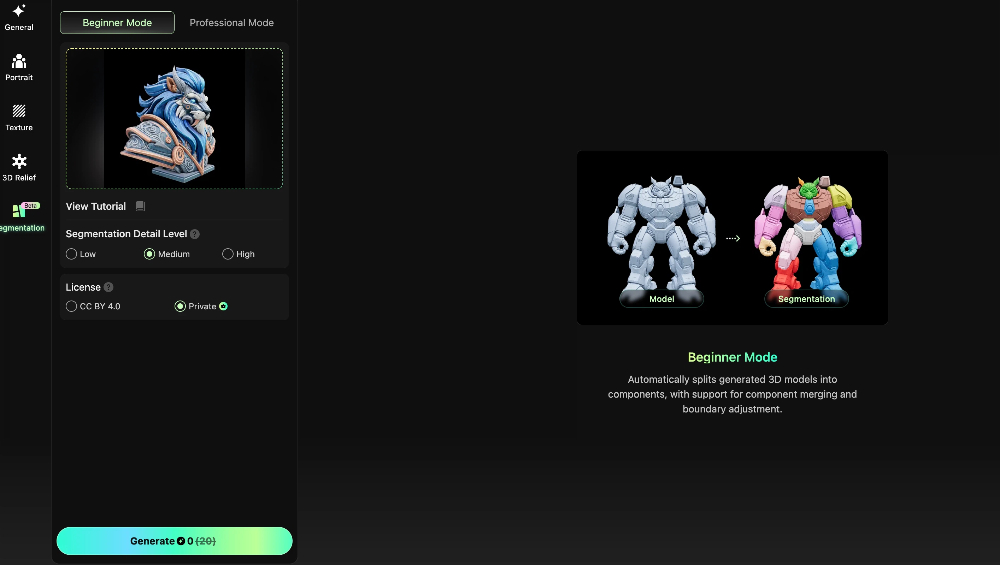
Step 2: Enter the Multi-Color Segmentation Workspace
Once the base 3D model is ready, the next step is to define how the model will be printed in multiple colors—where to print blue, where to print orange, and where to print white.
This is exactly what multi-color segmentation is designed to solve.
What I did
From the model detail page in Hitem3D:
- Click “Segmentation” at the bottom of the page to enter the segmentation workspace
- Choose a segmentation mode
- Beginner Mode: one-click automatic segmentation
- Pro Mode: manual control with editable segmentation masks
- Adjust the segmentation parameters if needed
Result
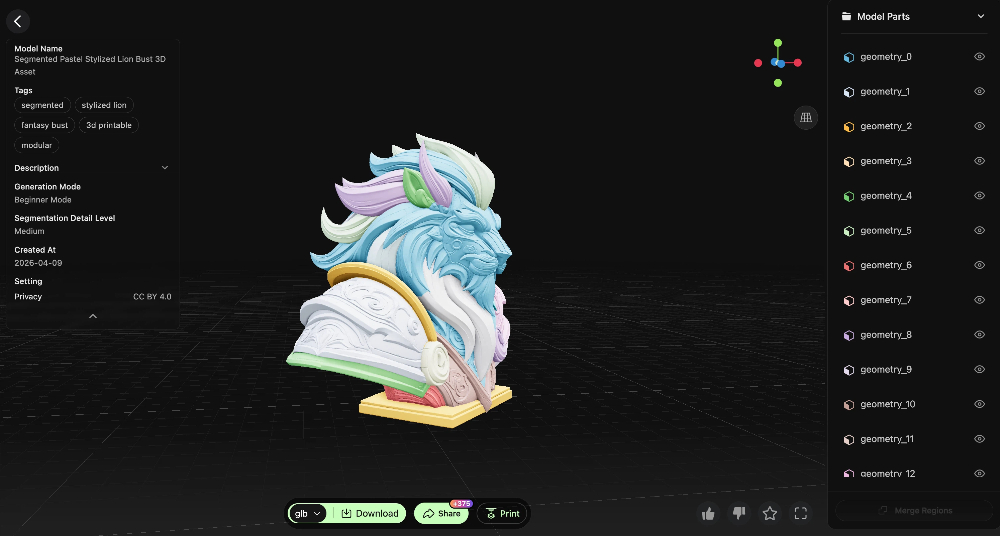
Within a few seconds, Hitem3D’s AI automatically identified the color regions across the model.
Fur, clothing details, ears, and other components were all separated into distinct color areas, each clearly labeled and ready for further refinement.
This initial segmentation already covered most of what was needed for multi-color printing, significantly reducing manual work in later steps.
Step 3: Refining in Pro Mode — Merging and Fixing Color Regions
This is the most technical part of the workflow—but in practice, it’s much simpler than it sounds.
In Pro Mode, there are only two things you need to do: merge and refine.
(If you’re using Beginner Mode, you can safely skip this step.)
Action 1: Merging Color Regions
During automatic segmentation, the AI may separate areas that should share the same color.
For example, in this model, the left ear and the right ear were detected as two separate color regions.
For actual printing, however, they should clearly be the same color. What I did:
- Open the Color Mask panel
- Select both the left ear and right ear regions
- Click the Merge button
Once merged, both regions become a single color group.
I repeated this process for all parts of the model that were meant to be printed in the same color.
Action 2: Fixing Color Boundary Issues
While AI segmentation is highly accurate, minor misclassifications can still occur.
When that happens, Pro Mode allows you to fine‑tune the results with manual adjustments. What I did
- Switch to Professional Mode
- Use tools such as Lasso and Split to manually adjust the segmentation masks
- Click Confirm to preview the changes in real time
- If the result isn’t ideal, roll back using the history panel and try again
The entire process feels intuitive—almost like painting directly on the model.
The key difference is that you’re not tracing everything from scratch. The AI already gets about 90% of the segmentation right, and you’re simply correcting the remaining 10%.
Step 4: Export and Slice the Model (3 Minutes)
Once segmentation is complete, the next step is exporting the model with color data for multi‑color printing.
What I did:
- Click Print in Hitem3D to send the model directly
- Or download the file locally (multi‑color data is preserved)
Here’s the critical part:
After importing the file into Bambu Studio, all color regions were automatically recognized.
No manual painting was required. All I needed to do was:
- Assign filaments to each color
- Scale the model to a fist-sized desktop display
- Click Slice
In the slicing preview, every filament change was clearly visible, and the color boundaries matched exactly what I had set in Hitem3D.
Step 5: Printing and the Final Result
I sent the sliced file to the printer, and the AMS handled filament switching automatically.
About two hours later, the print was finished.
Results
- Clean color boundaries with no bleeding
- Smooth transitions between blue and white areas
- Clear separation between orange ears and the blue body
- Fine surface details fully preserved
Total time from image to physical model: approximately 2.5 hours (including printing)
Actual hands-on time: less than 15 minutes
Creator Feedback: What Users Are Saying
Since launching this feature, we’ve received strong feedback from early users. Here are two examples:
“Multi-color printing used to be the most painful part for me. Painting a single model in Bambu Studio could take over an hour. With Hitem3D, the AI handles most of the work—I just merge a few regions, and I’m done in 10 minutes.”
— @3D_Printing_Fan, Maker
“I recently took a custom figurine order that required four colors. I usually avoid these jobs because manual color separation takes too long. This time, from image to segmented model, it took less than 30 minutes. The customer received the print the next day.”
— @MiniPrintStudio, 3D Printing Farm Owner
Who Is This Workflow For?
This workflow is a good fit if:
- You want to turn a 2D design into a multi‑color 3D printed object
- You already have an STL or OBJ file but don’t know how to segment colors
- You’ve tried manual painting in Bambu Studio and found it slow and exhausting
- You need to iterate multi‑color prototypes quickly
- You run a 3D printing farm and handle multi‑color orders at scale
Common Issues and How to Solve Them
Problem 1: The image‑to‑3D model lacks detail
Solution: Hitem3D supports multi‑view inputs. Uploading both a front and side image can significantly improve accuracy.
Problem 2: Some color boundaries are still inaccurate after AI segmentation
Solution: Use Pro Mode editing tools. Zoom in and adjust with a smaller brush size. In most cases, all fixes can be completed within five minutes.
Get Started
You don’t need a 3D artist.
You don’t need to spend hours painting colors by hand.
You don’t need to jump between multiple tools.
One image → a multi‑color 3D model → a printed object
With Hitem3D, the entire workflow can be compressed into under 30 minutes.
👉 Try it now:hitem3d.ai